Building a Brainforest - The Tech
Visit the Brainforest
For the last year or so, I've been experimenting with a new form of note-taking. At school age I discovered quite quickly that by writing things down in my own words I could keep good amounts of working information in my head - and got quite good at passing exams. I also started to find interesting connections between subjects. But I never really tugged at those strings properly, so now as an adult I'm giving it another go.
The tool I use for this is Obsidian - a wiki-style markdown editor application designed for linked note-taking. Inspired by the How to Take Smart Notes book, itself drawing upon the Zettelkasten methodology, I have developed a process in which I orient notes based upon ideas, rather than the resources which those ideas sprouted from. By linking these notes together, one builds a web of synthesized concepts, out of which new ideas emerge. This is my current Obsidian graph:
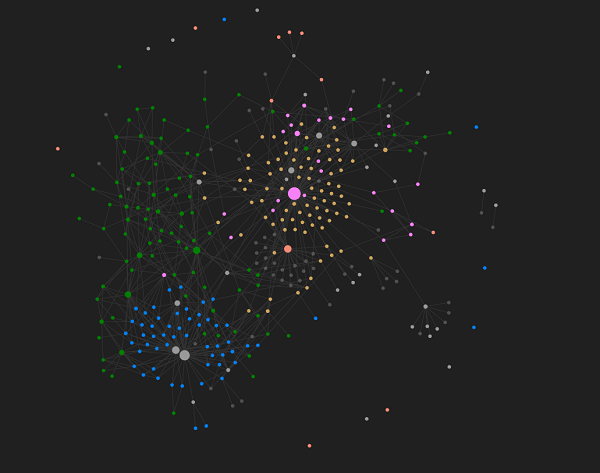
The core concept in this note-taking system is the production of evergreen notes - concept-oriented, deeply-linked, atomic notes. I'll touch more on how I go about writing these in a later blog post, but in this post, I'd like to talk about how I go publishing these evergreen notes to my website. There is no formal hierarchical structure to these notes - it's a web. Therefore, I'd like the app to almost take on the "choose your own adventure" feel, giving little in the way of direction and allowing the user to explore based on what interests them.
Although an off-the-shelf paid-for solution exists in the form of Obsidian Publish, I decided to try and build something myself as a weekend challenge. In particular, I didn't want to use any JavaScript frameworks such as React. On the first Saturday a working version with some dummy notes was up and running. Sunday afternoon was used to add some animation effects. During breaks at work through the week I tinkered further - adjusting the styling, tidying up the build process, adding stats collection and some helper pages.
This article covers the implementation as of commit 850f39 - which will no doubt evolve, but this is the latest at the time of writing.
The Build Process
First, I need to transform my Obsidian evergreen notes from their Markdown form into HTML pages. This is run as a simple NodeJS script utilising the builtin fs file reading library. Because my Obsidian workspace contains more than the evergreen notes - I simply copy over the evergreen/ folder into the brainforest repo. Hey, it's manual, but it does act as an extra backup!
The main function orchestrates the following steps:
- Read the directory containing the markdown notes, to get a list of files - using
fs.readdir - Read each file and transform Obsidian wiki-links to standard Markdown links
- Append additional templates to the content, such as the stats section on the introduction page, or a backlinks section on a note page
- Convert to HTML and write to the file system
Throughout the process, I maintain an object (called nodes) to track each page and its outgoing and incoming links. This object is useful for generating stats about the notes in the brainforest, but it is also used to calculate backlinks to a given page - essentially, what other notes link to this page?
The file names in Markdown are plain English, spaces and all. This is deliberate, as it makes the links in Obsidian much more readable. As part of the transformation to Markdown, I 'slugify' the file names to turn them into a string which is more suitable to be used as an id in HTML:
function slugify(s) {
  return s
    .toLowerCase()
    .replace(/[^a-z0-9 -]/g, "") // remove invalid chars
    .replace(/\s+/g, "-") // collapse whitespace and replace by -
    .replace(/-+/g, "-") // collapse dashes
    .replace(/^-+/, "") // trim - from start of text
    .replace(/-+$/, "") // trim - from end of text
    .replace(/-/g, "-");
}
The nodes object is constructed by iterating over the array of file names, and converting it (through a reducer function) into an object with the following shape:
const nodes = files.reduce((agg, fileNameWithPath) => {
  const { fileName, slug } = fileDetails(fileNameWithPath);
  agg[slug] = {
    fileName,
    outboundLinks: [],
    inboundLinks: [],
  };
  return agg;
}, {});
File links in Obsidian are written using the wiki-style convention. Unlike a conventional markdown link, [which looks like this](./a-path-to-go-to.html), an internal link is represented [[Like this]]. When reading a file, I also run the Markdown content through a replacement function that searches and replaces these links. It also is supplied with the nodes object so that it can check whether an internal link actually exists. It is this function that updates the nodes object to track outgoing and incoming links:
function deObsidianify({ fileName, slug }, data, nodes) {
  // Add file name as a <h1> element
  const title = `# ${fileName.split('.')[0]}`;

  return `${title}\n\n${data}`
    .replace(/\[\[[A-Za-z,'\- ]+\]\]/g, match => {
      const trimmed = match.replace('[[', '').replace(']]', '');
      const linkedSlug = slugify(trimmed);

      if (nodes[linkedSlug]) {
        nodes[linkedSlug].inboundLinks.push(slug);
        nodes[slug].outboundLinks.push(linkedSlug);
        return `[${trimmed}](${linkedSlug}.html)`;
      }

      return '';
    });
}
Before running through the conversion function, there's some dynamic content that I'd like to append to the files. For the introduction page, I display some simple stats about the number of notes and links between them, alongside a last published time. For an individual note, if there are backlinks to it, I append a section linking to those notes. Without a JavaScript framework to rely on, I instead used JavaScript Template Strings - a modern language feature for dynamically constructing strings:
const backlinksHTMLTemplate = ({ inboundLinks }, { nodes }) => inboundLinks.length ? `\n
<section id="backlinks">
<h3>Links here</h3>
<ul>
${inboundLinks.map(l => `<li><a href="./${l}.html">${nodes[l].fileName}</a></li>`).join('\n')}
</ul>
</section>
` : ''

const statsHTMLTemplate = ({ lastPublished, links, nodes }) => `\n
<h2>The Details</h2>
<ul>
<li>Last published: ${lastPublished.toLocaleDateString()}</li>
<li>There are ${Object.keys(nodes).length} notes in the brainforest with ${links} links</li>
</ul>
`;
Some interesting things about those templates:
- Note the
.join('\n')after the.mapover the array. By default, a comma is used as a separator when joining an array! If you omit a manual join, this is called behind the scenes and the outputting content will have an errant comma. - I wrote the content in HTML rather than Markdown, because I wanted the backlinks piece to live in a
<section>, which Markdown doesn't have a unique construct for. I could, on reflection, have written an extension to the markdown->html converter to support this. But any HTML content is passed straight through unchanged.
Conversion from Markdown to HTML is incredibly easy, using the showdown library. Just init the converter with any options you need:
const converter = new showdown.Converter({
  noHeaderId: true,
  parseImgDimensions: true
});
And then call it, writing the content to a file using fs:
function convertToHtml(file) {
  const html = converter.makeHtml(file.data);
  const fileName = `${file.slug}.html`;
  fs.writeFileSync(path.join(outputDir, fileName), html, { encoding });
}
What I end up with is a directory containing a HTML page for each individual note. At runtime, the code in the browser can then retrieve these and stitch them onto the page! For local development, these HTML pages are served from an express server to mimic how the content is hosted on Gitlab Pages.
The Browser Script
Moving on to the job of the browser code, then. In a nutshell, it should load the introduction note and then listen out for any clicks on <a> links. Rather than allowing the browser to handle these and navigate to a new page, it should intercept the event and load the link's content using an XHR request, appending the resulting content to the current page. Simple!
There are three core steps to this:
- Retrieve the article content
- Adding the new article content to the page DOM
- Setting up event listeners to intercept link clicks.
The first piece is rather trivial, using the fetch API:
async function getArticleContent(url) {
  const res = await fetch(url);
  if (!res.ok) {
    throw new Error(res.status);
  }
  return await res.text();
}
Creating the article is actually itself rather trivial too. I want to keep the semantic structure of the overall page, as well as the loaded article content. Luckily, the HTML5 <article> element serves this purpose perfectly - allowing for its own nested structure of headings. I convert the article url path into an id by removing the relative path prefix ('/') and the trailing .html. This is then used to assign the article a unique id in the DOM.
function createArticle(id, content) {
  const article = document.createElement('article');
  article.id = id;
  article.innerHTML = content;
  notes.appendChild(article);
  markLocation(id);
  bindEvents(id);
}
Finally, binding the events. Given that an article has its own unique ID. I use this to grab the newly-created element and query it for any links (that don't have the external class). These represent links to other notes in the system. For each of those links, I add an event handler to the click event. It prevents the event from bubbling up to the browser - which would trigger a full page navigation. Instead, it retrieves the HTML and kickstarts step one of the process.
function bindEvents(id) {
  const article = document.getElementById(id);
  const links = article.querySelectorAll('a:not(.external)');
  links.forEach((link) => {
    link.addEventListener('click', (e) => {
      e.preventDefault();

      navigateToArticle(link.getAttribute('href'))
        .catch(_ => {});
    });
  });
}
If you look at the source code, you'll see there's a little bit more functionality there than this. I added some CSS animations to slide articles in, some error-handling functionality around loading duplicate articles.
One final feature I'd like to cover is the ability to link to a specific note. Whenever a note is inserted into the DOM, I call a function called markLocation with the element id. This uses the history API to update the URL. When a url is suffixed with #an-id, a browser will load the page and scroll to the DOM element with that id. I want to replicate this as close as I can.
function markLocation(id) {
  history.replaceState(undefined, undefined, `#${id}`);
}
So when the page loads, in addition to loading the introduction article, if there's an id in the URL pointing to a different note, also load that:
async function main() {
  const directLink = window.location.hash;
  const intro = 'welcome-to-the-brainforest';
  await navigateToArticle(`${intro}.html`);
  if (directLink && directLink !== `#${intro}`) {
    try {
      await navigateToArticle(directLink.split('#')[1] + '.html');
    } catch (error) {
      console.error(error);
    }
  }
}
Next Steps
At this moment in time, the app is pretty functional, and using the CSS (and altering the flex-direction from column to row), I can have decent views of the content in both desktop and mobile browsers. The JavaScript and CSS code itself isn't minified, but it's small enough to not gain a huge amount of benefit from doing so. There are a few little bugs that I'll fix when I can, but aside from that this is pretty much where I need it to be. I'm tempted to build a graph view dynamically as a user explores, in a Roguelike manner...
In the next post, I'll talk more about the note-taking aspect itself and what I've discovered from building my Brainforest! Don't forget that you can view the Brainforest source code repository and explore the Brainforest for yourself!