Creating a Pick'Em App with AWS Amplify
This post journals setting up AWS Amplify for my Pick'Em side project application, covering the desired application architecture and how to provision that infrastructure through the tooling.
About the App
My friends and I watch All Elite Wrestling (I've recently reviewed Revolution). Whenever they run a Pay Per View event, we usually exchange messages with our predicted outcomes for the matches on the event card. Many sports and live events have fantasy games where you can sign up, make your choices and score points based on the results - you can see similar Pick'Em apps for the NBA, NFL and the Premier League.
I thought that the scope of this would be self-contained enough that it would make a good candidate to build an application. Unlike the Premier League, there's not a Pay Per View event every week, so there is space to breathe with a near-term target date. For a while I've wanted to get properly stuck in to a cloud-native application that I have complete autonomy over, so all the mistakes can be made and learned.
The idea for the application then is that a user, upon invitation, can:
- See the current league table
- View the events, both upcoming and previously broadcast
- For an upcoming event, view the match card and submit predictions
- For a broadcast event, view the results and how everyone scored
I chose AWS Amplify (gen 1) as a kickstarter framework for this project. It's a quick way of scaffolding out the core infrastructure that you need for a web or mobile application, such as authorization/authentication, storage, hosting and so on. As you add resources, Amplify generates all the necessary CloudFormation. It also tracks the deployment statuses of resources and provides a mechanism for pushing updates to the cloud. There's a visual development environment (Amplify Studio, which I didn't use), alongside out-the-box UI components for various frontend libraries. A JavaScript SDK wraps the AWS SDK functions with user-friendly helpers. In essence, it's a very quick way of getting to MVP.
Proposed Architecture
My bank balance isn't ready for the entire world to start using my application, so I'll deliberately limit it in scope to a handful of users. That said, I'll try and do stuff "properly" and learn as much as possible.
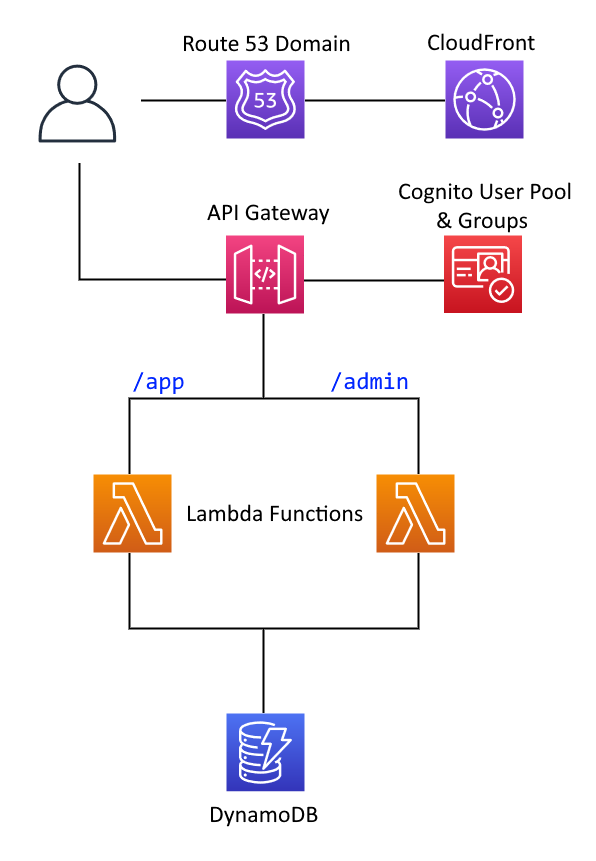
User accounts will be managed through AWS Cognito, as will their authorization permissions, being either a standard user or an administrator. Given the limited scope, there's no need to keep machines running constantly serving up the web application and backend APIs. I could build my own EC2 instances and let them autoscale down to zero, or embrace AWS Lambda functions. I'll choose the latter. The lambda functions will need to sit behind an API Gateway, integrating with Cognito so that only authenticated users can access the services. For data storage, I'll use DynamoDB. The database will track the game state - the matches, predictions, results and league table. The frontend application itself will be written in Vue, mainly because I want to try out a new framework.
Setting Things Up
The Amplify CLI isn't part of the AWS CLI, it's installed separately (and globally) via npm:
npm install -g @aws-amplify/cliOnce I'd installed that, alongside the AWS V2 CLI (new machine, fresh start), I then configured Amplify as per the documentation to refer to a specially-created IAM User. This is good practice as it limits the blast radius and capabilities of what can be done. The Amplify Administrator role is still fairly permissive, but it operates on the principle of least privilege.
Setting up a Vue app with Vite was as simple as running its creation script, which sets up a boilerplate application with a hot-module-reloading dev server that can be run with npm run dev:
npm create vite@latestNext is to create the Amplify backend by running amplify init and following the instructions. Most of the defaults were fine. This generates an amplify directory, which should be checked into source control. This is where any resources that you create, their configuration, and their code will live. Some contents are .gitignore'd by default, such as the auto-generated Cloud Formation, but inspecting it is a good learning opportunity to see what is happening under the hood.
Once initialised, you can then add your resources through the amplify add <resource-name> command.
Authentication
First, authentication.
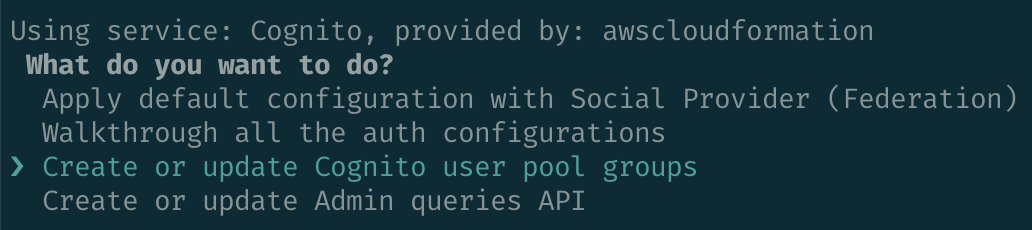
amplify add authsets up a Cognito user pool with the authentication means of your choosing. It's possible to handle federated login from multiple identity providers, but for simplicity's sake I chose email. The setup instructions don't let you add user pool groups, to do that I had to run amplify update auth and follow the options to set up the groups.
Storage
Next, the database. Now, Amplify's documentation pushes hard for a combination of DynamoDB with GraphQL and AppSync. I'll go into more detail about why I'm not taking this route in the next post, but for now, I'm going to go off-piste. The main reason for this is that I want to design my DynamoDB table according to the Single Table Design pattern.
To add a DynamoDB database, run the command and follow the instructions!
amplify add storageIt will prompt for a partition key, sort key, and if you want to add Global Secondary Indexes, how they should be partitioned too. I set up a basic table with generic partition and sort keys (PK and SK respectively), plus a Global Secondary Index with two more generic keys (GSI_PK and GSI_SK). I was surprised to learn that this sets up the table in provisioned mode - this is where you specify the expectations of read/writes in terms of capacity units. To be quite honest, given the low traffic levels this is most likely a very sensible default. But I'm a stickler for only paying for what I use. It took me a while to figure out how to switch to On Demand mode - it's handled by overriding the resource: amplify override storage.
Overriding a resource provides an override.ts file in the resource's subdirectory, from which you can modify the CloudFormation. I needed to delete the pre-configured provisionedThroughput property on the main table and the secondary index, and then set the billingMode.
import { AmplifyDDBResourceTemplate, AmplifyProjectInfo } from '@aws-amplify/cli-extensibility-helper';

export function override(resources: AmplifyDDBResourceTemplate, amplifyProjectInfo: AmplifyProjectInfo) {
  delete(resources.dynamoDBTable.provisionedThroughput);
  delete(resources.dynamoDBTable.globalSecondaryIndexes[0].provisionedThroughput);
  resources.dynamoDBTable.billingMode = "PAY_PER_REQUEST";
}
API
I'm going to define two Lambda functions, for now. One is to handle API traffic for users, the second for administrators. Lambdas are added, you guessed it, with the add command:
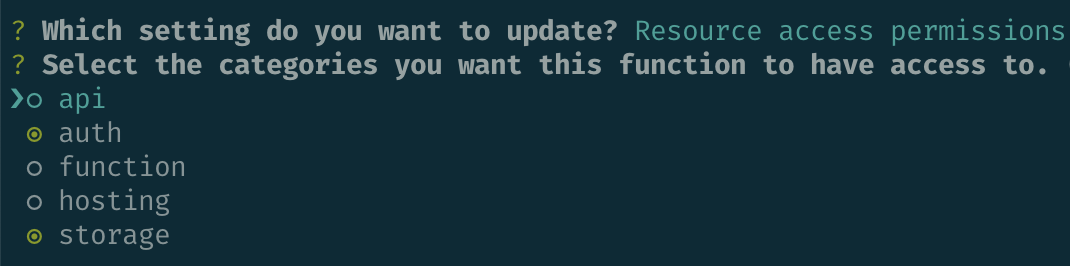
amplify add functionAs the functions are going to connect to DynamoDB, I opted for the DynamoDB template, which boilerplates you with an express application with some use cases for retrieving and storing data. Once defined, I needed to then run amplify update function for each, so that I could select "Resource access permissions" and permit access to the auth and storage resources.
The Lambda functions are not invoked directly by a user, rather, they're invoked by events trigged from an API Gateway. Adding this is a case of running amplify add api, choosing REST from the options (opting for GraphQL takes you down the whole AppSync route). You're then prompted to define API routes and what to do with them. I defined user API traffic as coming in on the /app path, and directed this traffic to the existing Lambda function created earlier. I did the same for admin traffic, on the /admin path, to the other Lambda. Each route is protected - for the /app path the user can be in either the users or admin user pool groups, /admin is just for admins. When creating the API Gateway, you are prompted with a choice to restrict access to a path. Choose "Individual Groups" to select from the Cognito user pool groups defined in your project.
Hosting
amplify add hostingsets you up with a CloudFront distribution for static content (that's the HTML, CSS, JavaScript and images) for the web application. I opted for manual deployments, although it is possible to connect to a git repository and have a fully-integrated CI/CD pipeline, such that when code is pushed it is automatically built and deployed. I'll probably come back to this at a later stage.
Adding hosting gives access to the amplify publish command for when you're ready to update the frontend.
Domain Name
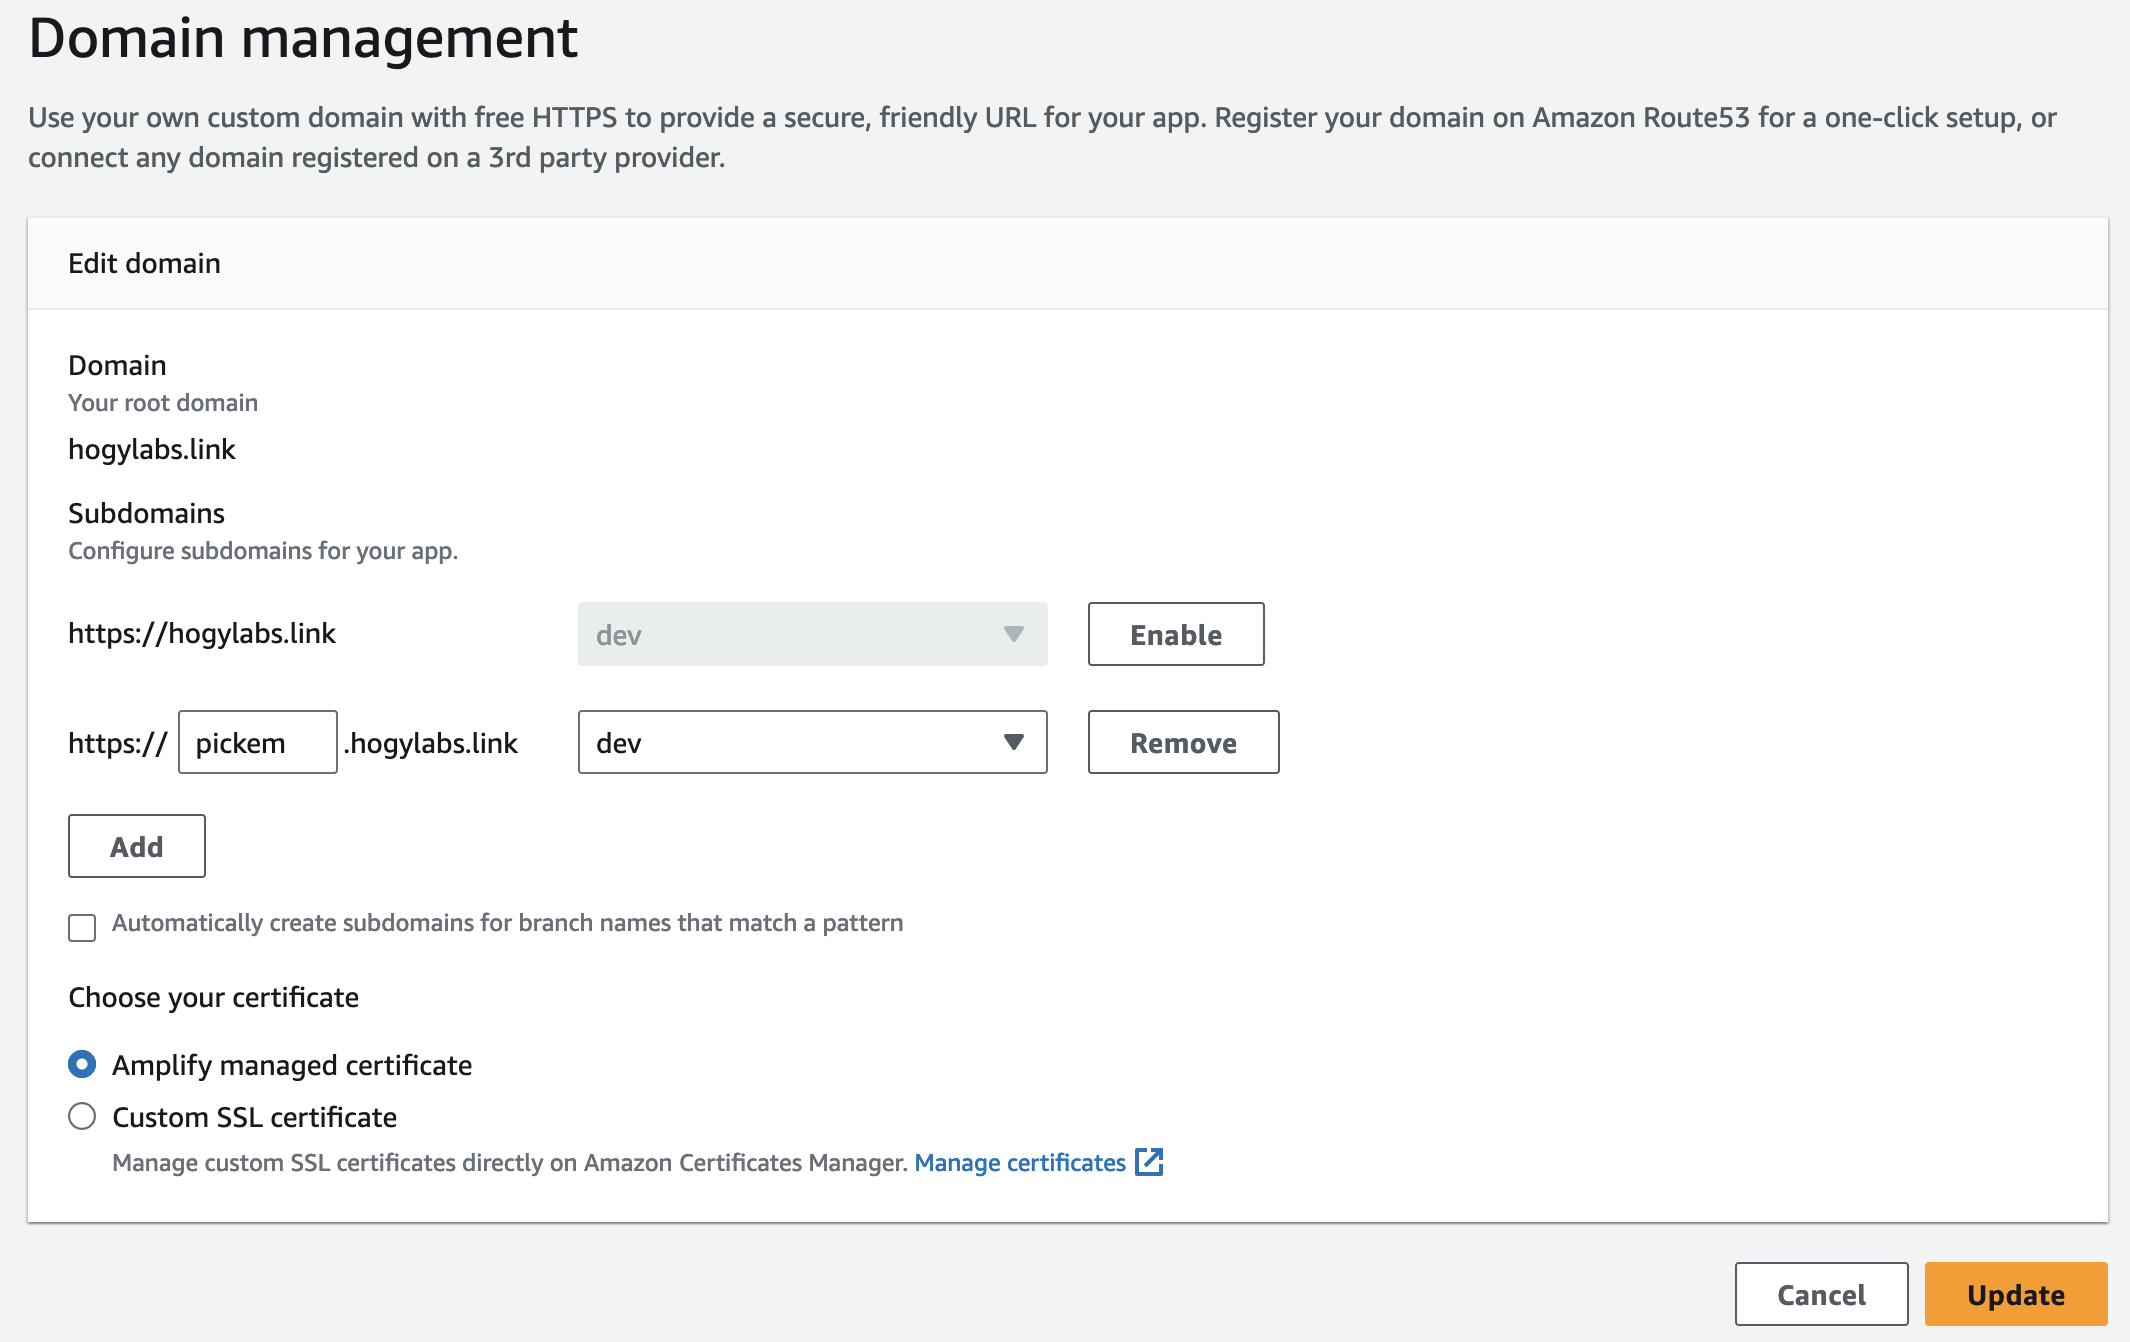
Configuring a domain name is not done through the Amplify CLI. Running amplify update hosting will redirect you to the Amplify section of the AWS Console. I purchased a new domain name from Route 53, and then using the Amplify "Manage Domains" page, I could configure subdomain routing.
Right now, I've only the one amplify environment created (defaults to 'dev') and so all I need to do is point the subdomain to the Amplify environment. This will then begin to provision an SSL certificate.
Amplify instructed me to add two CNAMEs into the DNS record for my domain, this is part of the SSL verification process and to redirect to the CloudFront distribution.

Making all of this infrastructure appear in the cloud is a case of running amplify push. Magic!
Next Up
Before getting started on the frontend application, I'm going to resist the magpie "ooh shiny" urge and focus on the database design. As mentioned above, I'm following the Single Table Design pattern for DynamoDB and this requires quite a bit of thinking and explanation to get right. But once in place, most other stuff should be a relatively straightforward implementation.
The next post will focus on defining the data model, based on the application's access patterns. After that, I'll talk about building out the lambda functions for the app API, and then move on to the frontend.