Creating A General Election Slackbot
With the surprise announcement of a General Election in the UK, I created a SlackBot to track the polling performance of the major UK parties. In this post, I'll show you how I created it.
I used NodeJS, with the help of some awesome npm libraries and got the application up and running in a few hours. The application is deployed to Heroku, which I'd never used before, but I found it incredibly easy to manage deployments.
Handling Environment Variables
When you register a new SlackBot through your Slack instance settings, you'll be presented with an API key. This is used to identify your bot and to allow for it to post to your Slack.
Locally I specified an .env.local file to hold environment variables that are required by my app. This is much more preferable to adding them to my real PATH. Furthermore, the file is included in the repository .gitignore, so that the secrets are not accidentally committed to the public repository. I'll talk later about how these are configured in Heroku. My .env.local file looks like:
BOT_API_KEY=<my api key>
BOT_NAME=electionbot
The env-cmd npm package reads this file to set up the environment. When developing locally, the app is started via a package.json script:
"start": "env-cmd ./.env.local node index.js",
Then, you can read any of these variables from within your node app:
var token = process.env.BOT_API_KEY;
var name = process.env.BOT_NAME;
Creating a SlackBot
Creating a SlackBot involves setting up a WebSockets connection and interacting with Slack's "Real-Time Messaging API". This is quite low-level for a simple bot like mine, so I found a helpful npm package, slackbots to manage this for me.
All you need to do is create a new instance, passing in your token and bot name:
var Bot = require('slackbots');

var mySlackBot = new Bot({
  token,
  name
});
In the simplest case the bot object then allows for you to attach callbacks to events, alongside an easy-to-use API to post messages:
mySlackBot.on('start', function() {
  mySlackBot.postMessageToChanngel('general', 'hi!');
});
I created a subclass, which would register callbacks and handle the lifecycle events I'm interested in:
start- Called when the bot goes live.message- Called when ANY message is posted to your Slack.
class ElectionBot extends Bot {
  constructor(settings) {
    super(settings);
    this.settings = settings;
    this.on('start', this.onStart);
    this.on('message', this.onMessage);
  }

  onStart() {
    // TODO: Startup Script
  }

  onMessage(message) {
    // TODO: Handle Message
  }
}
On startup
On startup, id for the @electionBot user is calculated, which allows the bot to post into Slack as @electionbot:
this.user = this.users.filter(user => user.name === this.settings.name)[0];Handling a Message
As mentioned earlier, every message sent to your Slack instance will result in your message callback being called. Therefore, you'll need to apply some logic to work out if the message is actually something that is actionable by your SlackBot. I wrote a series of convenience functions to handle the following conditions:
- The message is from a different user:
message.user !== this.user.id; - The message is a message (rather than any other type):
message.type === 'message' && Boolean(message.text) - The message mentions @electionbot:
message.text.indexOf(<@${this.user.id}>) > -1
(Note the strange syntax there - Slack uses these identifiers to mark user ids, groups, direct messages etc.)
If all of these conditions are true, then a user has asked for @electionbot to perform some action. It will need to respond. This could take some time. To improve the UX while awaiting a response, I respond with a placeholder signal which indicates that @electionbot is in the process of replying:
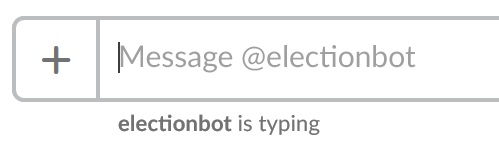
Unfortunately this is not a feature directly supported by the slackbots package API, but it does expose the underlying ws object. We can therefore achieve this by sending the following formatted message down the WebSocket.
this.ws.send(JSON.stringify({ type: 'typing', channel: message.channel}));Very simply, the SlackBot will perform its function if the message contains the text 'westminster'. If detected, then we'll post a response.
To put all this together:
onMessage(message) {
  if (this.isFromSomeoneElse(message)
    && this.isMessage(message)
    && this.mentionsMe(message)) {

      this.sendTypingResponse(message.channel);

      if (message.text.toLowerCase().indexOf('westminster') >= 0) {
        // TODO: Calculate polling data
      } else {
        // TODO: Command not found
      }
  }
}

isFromSomeoneElse(message) {
  return message.user !== this.user.id;
}

isMessage(message) {
    return message.type === 'message'
      && Boolean(message.text)
}

mentionsMe(message) {
  return message.text.indexOf(`<@${this.user.id}>`) > -1;
}

sendTypingResponse(channel) {
  this.ws.send(JSON.stringify({ type: 'typing', channel: channel }));
}
Computing Average Polling Data
Britain Elects maintain an up-to-date list of polls, conducted by a variety of pollsters. Sadly, it's presented purely as tabulated data, rather than some queryable API. I used the table-scraper npm package, which visits a specified URL and returns an array of tables parsed from the returned HTML page.
A table is an array, with each item in the array being a row. Each row is an object, and you can access a given cell by referencing its header column name. So for a table with a header column called 'Lab', you can access the second row's 'Lab' cell by:
table[1]['Lab']
My calculation takes the past eight polls, and computes a running average with a sample size of seven. The most recent polling data is returned as the current polling levels, but the difference between the two samples allows us to identify if there has been a significant movement in the polls.
A more realistic average would probably assign weights to each poll, but I figured the mean was good enough for our Slack experiment. I used bignumber.js to ensure that the calculations do not suffer from floating-point precision errors, and moment for date representation.
This returns an object of the following format:
{
  "data": {
    "con": 43,
    "lab": 38,
    "ldem": 8,
    "ukip": 4,
    "grn": 2
  },
  "diff": {
    "con": -1,
    "lab": 2,
    "ldem": 0,
    "ukip": 0,
    "grn": 0
  },
  "meta": {
    "sample": 7,
    "from": moment(...),
    "to": moment(...)
  }
}
Posting the Response
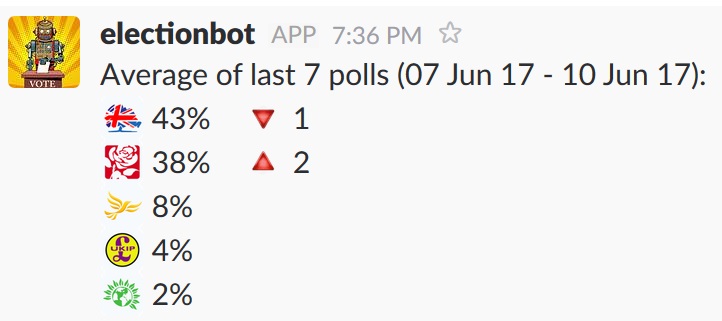
The result object above is formatted into a string:
`Average of last ${response.meta.sample} polls (${response.meta.from} - ${response.meta.to}):\n` +
`${formatRow(response, 'con', ':conservative:')}\n` +
...
Where formatRow is a convenience function. It takes the result, a property accessor, and an emoji to display. It produces a string that may contain an up or down arrow, should the polls have moved. This function is called once for each party:
function formatRow(result, accessor, emoji) {
  const percentage = `${emoji} ${result.data[accessor]}%`;
  const change = result.diff[accessor];
  if (change > 0) {
    return `${percentage}\t:small_red_triangle: ${change}`;
  } else if (change < 0) {
    return `${percentage}\t:small_red_triangle_down: ${change * -1}`;
  }

  return percentage;
}
For posting messages back to the sender, we define a post function. It calls the bot api's own postMessage function, alongside the as_user param. This makes sure that the message within the group is attributed to @electionbot.
post(channel, message) {
  this.postMessage(channel, message, { as_user: true });
}
To add a bit of flavour to the app, I'm also using Slack's custom emoji feature. Any emoji that are enabled by default, or added in your Slack settings, can be used in a response via the :emoji_name: syntax. My Slack app has custom emoji defined for each party.
Additionally, if a command cannot be interpreted, the SlackBot posts back a response:
postDontKnow(channel) {
  this.post(channel, ':question: Sorry, I don\t understand.');
}
Deploying to Heroku
I don't keep my computing running all the time, but I would like for @electionbot to be always-available. Heroku is a cloud application platform that supports a wide range of programming languages, including Java, JavaScript (NodeJS), Python and Go.
Once you've created an account with Heroku, you'll need to download the Heroku CLI, install it, and link it to your account.
Heroku apps, upon deployment, look for a Procfile to identify startup tasks. This is instead of a package.json file. We specify that we'd like to start a node application.
worker: node index.js
In your Heroku app's settings, it's possible to configure environment variables for your app. I copied them over as they're not checked in to the git repo (remember, .env.local is .gitignored!).
There are two ways that you can deploy to Heroku. A Heroku app comes with a git remote, which you can directly push to:
git remote add heroku <url.git>
git push heroku master
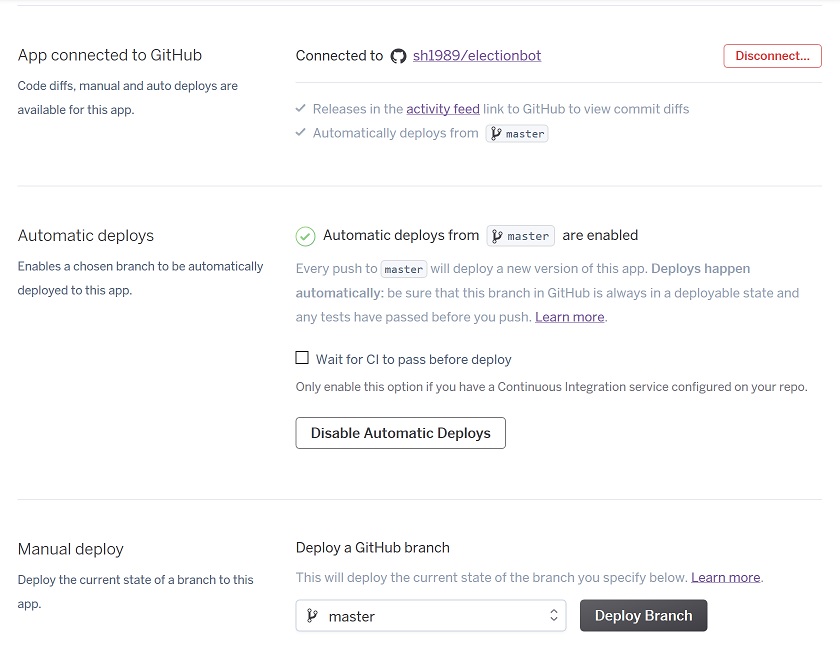
I used this method first in order to test that everything worked out correctly. However, pushing to two remotes (GitHub and Heroku) isn't particularly ideal. It is also possible to connect your Heroku and GitHub accounts together. This way, every time you push to GitHub, a Heroku deployment is triggered. There's also the option to trigger a manual deployment from a specific branch should you ever wish to perform a deployment of some experimental code. This is all accessible from the Deploy tab of your Heroku app.
Conclusion
You can take a look at the code if you'd like to take a deeper dive. The real version of the app handles several commands, so the scraping logic has been extracted into a generic function. See scraper.js for the functions to compute the average, and westminster.js for an example of how to interact with this class. You'll notice that the real @electionbot can also return results for the Welsh Assembly, Scottish Parliament, and the Scottish voting intention for the Westminster Parliament!
In short, I found creating the SlackBot quite an enjoyable experience and it's served its function quite well over the past few weeks.